
|
|
FreeForm Tutorials |
|||||||||||
|
|
FreeForm Tutorials The following are tutorial videos that begin with the creation of a simple cube and then build on this to discuss more complex capabilities. Step by step instructions can be found in the SAi Box and Display User Guide
Watch the Videos and then use the related chapter in the User Guide to replicate. · Begin by creating a cube and saving it with an ‘fs’ file extension i.e. cube.fs · In following tutorials, use your created file (or use provided starting.fs file) to use with tutorial instructions. o The starting.fs files are included below the tutorials here and are prefixed with nn- e.g. 02- glueflaps.fs o To use, just double click on required file link [Chrome] and Box&Display will recognize the fs extension and open. v If this doesn’t work, right click on required file link and select ‘Save target as’ to save in your file area for use with Box&Display. You may need to change the extension to fs · The finished product ‘nn+ final.fs’ file is also provided, just in case you need it. |
|||||||||||
|
Chapter 7 |
FreeForm Tutorial 103 |
FreeForm Tutorial 104 |
|
|||||||||
|
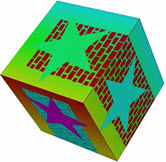
Use the ‘New’ button
which opens the Box&Display Follow the instructions to make a box with lid and illustrate with Flexi. |
In this tutorial, we will add Glue Flaps and Folding Flaps to box just created. Included in this lesson… Ø Alignment and Snap to Grid Ø Copy Section to Clipboard and Paste Ø Chamfer Ø Folding Control |
In this tutorial, we will make the box in Tutorial 103 double the size without altering the shape. Included in this lesson… Ø Active Section – Scale Height with Width Ø Horizontal Stretch Mode / Proportional Ø Vertical Stretch Mode / Proportional |
|
|||||||||
|
|
|
|||||||||||
|
Parametric Scaling FreeForm Tutorial 105 |
FreeForm Tutorial 106 |
FreeForm Tutorial 107 |
|
|||||||||
|
The use of Formulas allows you to set a Section to a value which can be changed at a later time allowing your box to be resized proportionally. The Dimension Quick Entry > More button, opens a dialog box that lets you extend the use of the 1-9 input controls. Watch this series of videos and see how. Part 1 Connect to Formulas Part 2 Proportional Stretch Mode Part 3 Proportional to Base Line |
In this tutorial, we are going to make a Flap from scratch which approximates the shape of the Dust Flap that can be imported from the Library (discussed in Tutorial 109). Included in this lesson… Ø Machine Steps: Open/Close, Hide/Unhide Ø Points: Drag and Add After Ø Mirror-complete Machine Step |
Ctrl-R can be used to repeat the last command executed for the following… *Add Basic Flap *Drag Point *Fillet Corner (rounded) *Curve Line *Paste Clipboard Section *Chamfer Corner *Paste Clipboard Subtree *Adjust 2 Arc Corner *Add Import Section Ref *Fillet with 2 Arcs |
|
|||||||||
|
|
||||||||||||
|
FreeForm Tutorial 108 |
FreeForm Tutorial 109 |
FreeForm Tutorial 110 |
|
|||||||||
|
In this tutorial, we will learn how to curve lines and fillet corners. Include in this lesson… Ø Create square and circular cutouts |
In this tutorial, we will learn how to import a library flap into your custom drawing and edit the import to suit your requirements. [Clipboard & Imports] Included in this lesson… Ø At Section: Adjust Section Height Ø Convert to local copy Ø Lock/Unlock |
In this tutorial, we will learn how to add annotations to your box using dimension and arrow Machine Steps. Included in this lesson… Ø Format Machine Step: Dimension Ø Point Position: Align to Axes Ø Add Label Arrow |
|
|||||||||
|
|
||||||||||||
|
FreeForm Tutorial 111 |
FreeForm Tutorial 112 |
Pen Holder Display FreeForm Tutorial 113 |
|
|||||||||
|
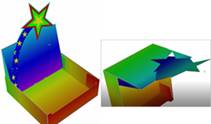
In this tutorial, we will learn how to create a flip up, which is a common feature of point of sale boxes.
|
In this tutorial, we will learn how to create a box with rivet holes, accurately positioning holes. Part 1 Create freeform box Part 2 Add Holes with precision Part 3 Fixup Flaps |
Part 1 Design Layout Part 2 Design Layout Part 3 Adding Slots Part 4 Adding Tabs Part 5 Adding Holes Part 6 Final Steps Part 7 Adding Illustrations |
|
|||||||||
|
ADVANCED |
||||||||||||
|
|
||||||||||||
 user interface
called the Property Inspector.
user interface
called the Property Inspector.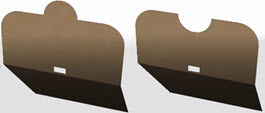
See
also the four detailed video tutorials on the CastleWall Project 
And
see the detailed video tutorials on the Countertop Display Project 